CLICK HERE FOR FREE BLOGGER TEMPLATES, LINK BUTTONS AND MORE! »

Friday, October 21, 2011

He Cooks, She Cooks

Ok this is NOT something that I did. But I just learned tonight that chef/owner of the restaurant that my brother works for has a reality TV show with his wife. David is the chef/owner of the restaurant he works at and then Suzanne who owns a few other amazing restaurants here in Los Angeles.

I think the show sounds really interesting. I have to go check & see if we get the Cooking Channel... if not I hope they list the full episodes online.

 
presents
Suzanne & David give us a behind the scenes look as
they prepare for and host a benefit for the Hollywood Farmers Market.
Follow along as they travel and discover the source of their menus and as
they challenge one another to create different dishes using the same ingredients.


P.S. I asked Johnny if he'd be on the show & he said that he didn't work there then. I'm sure you were wondering about it too. ;)

Super Bags for Super Boys

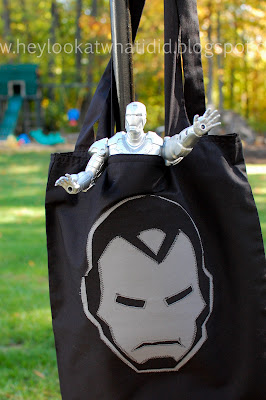
My boys are OBSESSED with superheros! OBSESSED! So of course they wanted to be superhero's for Halloween. I wish I could have convinced them to be something cute or unique... or at least coordinate... but nope, not this year.

Dominic was adamant that he be the Green Lantern and Vincent insisted on being Batman. Not even Batman & Robin for mom. ;) But I did decide after watching them collect various items and tote them around in plastic shopping bags that I could at least make them some treat bags for Halloween. As I posted before when I made the Lalaloopsy bag - the Batman bag was my first ever. I don't have a pattern or even really measurements, I just start cutting & sewing. It seems to work because each one seems to get better... in my opinion anyway.

After I mentioned to some friends that I was doing these for my superhero's a good friend asked if I would make some for her 2 boys that are also dressing up as superhero's too. I was happy to, I am so pleased with how they've turned out. What do you think of them?

My boys love theirs & will be taking them to the EIU Homecoming Parade tomorrow to collect candy in. Dominic has taken his to school everyday this week instead of a book bag. I'm just thrilled that he's so happy with something that I made him!


 Perfect for taking along your favorite superhero book (Superhero ABC's)


*the action figures/masks are only props ;)

I've decided that once I am caught up on a few more projects for my family I'm going to make more of these to put up on Etsy. Stay tuned!

I think these are perfect to include with a book or toy like I have done above.

Ghost's in a snap & on a dime!


Last year at this time I was looking for a quick & cheap Halloween decoration to put out on the porch. I came up with this idea. Since I actually made these last year. I don't have pictures of all the items or every step but I've tried to improvise for you! :) I used Wal-Mart plastic shopping bags for 2 reasons 1) I have tons of them & 2) they couldn't get ruined by rain hanging outside.
There is NO sewing in this project! Don't be scared to try it. :)

Materials needed: (to make 6 - you can easily make more or less)
1 twin size (or larger if you have it) white flat bed sheet (fitted would work too)
2-wooden dowel rods cut into 6 or more pieces (depending on how many ghosts you are making)
1 black Sharpie marker
Clear fishing line
Scissors
6 white zip ties
Hot Glue & Hot Glue gun
1 Sewing needle
30 Wal-Mart or white shopping bags (finally a use for them!)- about 5 for each ghost

 Steps:
1.) Cut your sheet into 6 squares or rectangles - I didn't really measure it out, just tried to make them as equal as possible. I did not sew the edges or anything - I'll just say I think the rough edges add character & that you don't even notice from afar.


2. Take 4 or 5 shopping bags & form a ball, then put that ball inside of the final bag. Leave the handles hanging so that you can tie them around the dowel rod.


 3. Place a piece of the white sheet over the "ball of bags" and secure in place with a zip tie (this is a quick & easy way to secure it - if you don't have zip ties then I am sure you could tie it w/ more fishing line or something.


 4. Using the handles of the shopping bag tie the ball/sheet to the dowel rod (knot it several times tightly).


5. Run a bead of hot glue down the edges of the dowel rod & press the sheet down over it - this way it stays in place while flying outside in the wind.


 6. Draw faces on with your Sharpie marker - happy or mad - whatever you want. The sharpie does not bleed or fade away if out in rain.


7. Thread the needle with fishing line & then push it through the top of the ghost head. Its kind of hard to do because the fishing line is stronger & thicker than thread so you might need to press it on the table or something.


8. Tie a few knots to make the fishing line a loop then run outside & hang them up!


This is all the shelter from the weather that mine had last year & look cute enough still to put them up again. :) I thought briefly about ironing the wrinkles from being packed away ... and then I decided I'd rather blog about it instead!

Wednesday, October 19, 2011

Shop is open!

I did it! I actually opened up a shop this afternoon & listed the Lovely Laundry prints for sale. Earlier today I did sell some to a sweet mama from a message board I am on.  Now I'll just have to wait & see if these will ever sell again.

Just click on the image below to go to my new shop!


Pretty soon I hope to add some tote bags to my inventory. I just have to finish up a few for a friend here & Gabby's Halloween costume. Crossing my fingers.

What do you think of the logo & name? I thought this way it would tie in w/ the blog & not limit me to 1 type of item (just for girls or something).

Thanks for checking in!

If I get a good response I might try offering a blog reader discount code or something. :) Just thinking out loud.

Monday, October 17, 2011

Lovely Laundry

Over the summer I decided that I was tired of my laundry/mudroom looking completely out of the late 80's/early 90s with the awesome pastel plaid wallpaper (no offense if its your style... its not mine). So I finally got around to ripping out all of the wallpaper. Which shouldn't be that big of a deal, but in a small room moving the washer & dryer around to use a steamer on wallpaper that doesn't want to come off is almost worse than getting it off in a bigger room - atleast I could move easier (and do my laundry). Then it seemed to take forever to decide what color to paint. I did however know that I wanted some sort of "art" on the walls.

Well after some deliberation and inspiration from various blogs & such I decided to actually use some of Gabby's laundry as art ... I think that so many adorable options for little girls clothes are an artform anyway. What I came up with is to create a fake clothes line in the backyard and grab my favorites from her closet, hang them up and snap some pictures. Piece of cake right!?


Well this first attempt I used curling ribbon (you know the kind that you decorate presents with or put on ballons). The clothes were too heavy, stretched the ribbon and almost touched the ground. Plus it wasn't in a straight line and I just didn't like the angle. However I didn't decide that until I had it all cleaned up, the clothes back in her closet and it was dark outside.

Sooo... a couple of days later I set up a ladder and tied a line off the side of our deck to the ladder. (can you tell I don't have a real clothes line in the backyard).

However you could see the back of the neighbors house & since I wanted to do a series of shots (including tops, dresses, tanks, pants, rompers) I decided to do some work in Photoshop Elements and Lightroom on them. I won't lie, I worked for a few hours on this one night. However I am really happy with the results of how they turned out.


I just did this mock up for the blog - they are printed individually. I actually have decided to hang them on vintage washboards (you know pre-washing machines) with magnets holding them inplace on the metal. Only problem is that I currently only have 2 washboards -one is big that fits 2 5x7's and the smaller one fits 1 print. Sooo... I keep checking the local antique/vintage stores for more. I might have to go to some different towns soon. I want this part of my redo done! The background color is similar to the wall color so you can kind of get an idea though.

Thank goodness our backyard is fairly private, so neighbors couldn't see me (well I didn't see them at all) during this process of hanging clothes & taking pictures of them. But I also think it will be a fun way to remember some of her sweet outfits when she's grown up too. There are a few items I have made, mixed in with some Matilda Jane, Persnickety, etsy, and boutique... I love them all.

I am not done w/ my laundry room redo, but its getting better.

I am also thinking about adding these prints to that little Etsy shop I might be working on soon. I've had some feedback that there might be a few people interested them. Makes me feel good to know others appreciate it too - thanks!

Sunday, October 16, 2011

Bag Lady... Lalaloopsy style

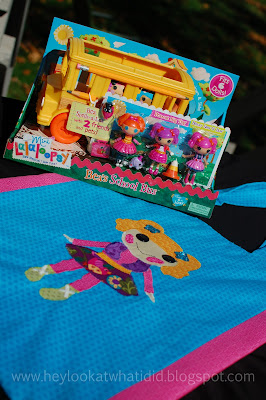
I have always loved a good handbag or purse and apparently that is carrying over into my children. My boys love to put their treasures & stuff into backpacks, shopping bags, baggies... anything and then carry it all over the house. Gabby loves her little baby toy purses too. So when I couldn't find anything fun for Halloween treat bags I decided to make the kids theirs to coordinate with their costumes. I made Vincent (2.5yrs) a batman bag & it was a HUGE hit with him.

So the other day when I went to the store to pick up a present for a sweet little girl down the street and got a Lalaloopsy set, I decided to make a detour to the fabric section to make her a bag to go with it. Have you seen Lalaloopsy dolls & the mini ones? They are so cute... or should I say "sew cute" since they are made to look hand sewn sort of - with buttons for eyes & stitched mouths. I just love how funky & fun they are but still pretty cute. This is the result... 


I have heard from a few mama's that they would like to buy something like this. I think that I am going to try to make up a few & open an etsy shop & see how it goes. What do you think?


I have to finish Dominic's Green Lantern bag now and do Gabby's that will be some sort of butterfly bag to match her costume which I still need to finish up too... I'll of course post about them all :)

As a side note... this Lala toy was a huge hit with Gabby (who is 1) and we just might have to see if Santa can put one under the tree for her (or me!).

Wednesday, October 12, 2011

Pumpkin Urns

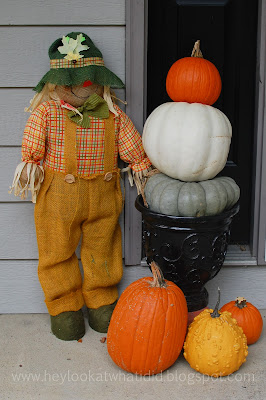
I love urns out front of houses. I just think they look so classy & elegant (not that I am saying my house is), but at many homes they give off that appearance. Over the summer I saved mine from a certain appointment with the trash man by spray painting them a glossy black. They are kind of small & so I am waiting for some hopefully cheap prices on them now that its fall for some bigger ones. Until the price drops though I am using mine.

Again inspired by Pinterest I was so excited to see some amazing ideas that featured pumpkins stacked on top of each other on urns! What could be cuter? It adds height to the urns and gives visual interest to the front porch. Plus it looks much cuter than my pile of pumpkins all clumped together like in years past. I found 6 total pumpkins - 2 greenish-grey colored almost flat ones for the base (here my small urns worked in my favor because I didn't need HUGE pumpkins to fill them), 2 white rounder, yet they still had flat surfaces on the top/bottom - though they are kind of wonky shaped I didn't see the other wagon of white pumpkins until we were pulling out of the drive- and then 2 small orange ones for the tops. I know they kind of lean - but I decided that I kind of like the whimsical feel it gives them.


Notice I said that my urns were small - so I propped them up with 2 bricks under each. I put these other pumpkins around the base of them. I plan on covering it with black fabric that's left over from a new project that I am going to start tonight.

Tuesday, October 11, 2011

Autumn Laterns

One of the many things that I have always loved on Pinterest is how people decorate their fireplace mantels. I find myself pinning so many different ideas... but I am kind of a creature of habit & just don't always get around to changing things up. Plus with 3 kids 4 & under I also know that if there are pretty things artfully arranged... well then, they are going to yank them down to see what happens. Whether that be mommy going crazy or to see if they can use whatever they've gotten their little hands on as weapons. Sooooo ... when I started noticing lanterns & hurricanes that were filled with different objects I thought "Ding, ding, ding! I can do that!" 

So last week armed with a Pier1 gift card (from a very generous friend) and a few hours shopping with only my 1 year old daughter I was on a mission to find either some hurricanes or lanterns for my fireplace mantle. Well the shopping gods were on my side because I was able to find both!
These are my first attempt at decorating with the lanterns... (ok second attempt because I do have a 2 halloween decorations I tried too & they looked cute, I'll share those soon).

I took my kids out to a local farm today that had some great pumpkins of all varietys - the best part is that it was something I could take the kids too without making a whole day excursion out of it :) I just wish I would've had my camera with me while we were there.


First I scrubbed away all the finger prints from the store & got them ready.

I also soaked my little pumpkins & gourds in hot water & vinegar to get the dirt/mud/bugs/sprays off of them. This is them drying


Next I just kind of started stuffing them in the lanterns & trying to arrange them so they weren't just stacked one on top of the other.


Voila! 2 perfectly pumpkin stuffed lanterns on my mantel!
Also I should mention that the little pumpkins were 3/$1 & the gourds were 2/$1 - so I have like $12 in there. :)
Well, what do you think?
What do you put inside your lanterns?

Monday, October 10, 2011

Pretty little mobile

After having 2 boys when we found out that baby #3 was going to be a girl I knew that I would do everything in my power to make her nursery a girly wonderland.
I was first inspired by this somewhat shabby chic bedding collection from Land of Nod


I wanted a beautiful mobile to hang above her crib... and this is what I created
Materials needed for this:
* 1 plain wreath (I got mine for about $5 at WalMart)
*  2 bushes of mixed flowers (these came from Hobby Lobby 1/2 off sale) - I pulled each flower & all of the greenery off
* Fishing line (clear)
*1 sewing needle (tie fishing line onto it & run it through flowers knotting crystal beads on the line to hold flowers in place)
* Bag of plastic crystal like beads (I alternated how many I used)
* 2 spools of ribbon to tie around the wreath to hang it from the ceiling.
* Hot glue gun/hot glue sticks to glue some greenery to the wreath on the top & bottom. :)


Here's a sneak peak at what her nursery looks like... though I've added somethings since last year. I'll do a more detailed post soon. :)


A bedroom fit for a superhoro ... or a super little boy

Last spring we moved and I knew that I would be changing my boys room's and we would also be preparing a nursery for the new baby girl we were expecting.

This post is featuring the room that I created for my oldest son (who's name is Dominic as you will see in the pictures)
Dominic was (and still is) really into superhero's. So after seeing some cute vintage looking superhero sign's in one of my good friend's son's room I knew what kind of a theme we were going with.
The signs were purchased online for like $8-10 each (search vintage tin superhero sign)
His bedding is all from Pottery Barn Kids - though we like the print on the sheets (he has 2 sets of superhero sheets) I do not think the quality of their sheets is worth their high price at all. :( They aren't soft, but he loves them so I guess its worth it - especially if it helps  him stay in bed all night.


The shelving unit was hand made by my husband and my dad - it was a copy of something I had seen on PBK, but it was made to fit around the window in Dominic's room in our old house. I love it!

We recently picked up a $10 headboard/foot board from a garage sale he wants it painted Navy blue, since I might as well paint his dresser too, will navy look ok against that bright blue wall do you think? I might have to take some pictures with a navy shirt or something against that wall to get opinions.

Oh how I love applique's

As I said before the main inspiration behind learning how to sew for me was wanting to make applique shirts for my boys. Here are a few of my first projects from 2 years ago.


Boo! Happy Halloween!
To create these Halloween Monster shirts I cut out all of the different face elements (eyes, mouth, teeth) and then ironed them onto the orange/black dot fabric in the positions that I wanted before cutting out & adhering the stabilizer to the orange fabric. Its so much easier to sew all of those details on before the face is attached to the shirt!!
I am actually going to take the monster face on the smaller size & put it on a girl shirt for my daughter now & add a bow to girly it up a bit. ;)


What little boy doesn't love cowboys?
These cowboy outfits were one of my favorite outfits I have ever created for the kids.

On the jean pockets I hand stitched at the pocket openings so that the pockets weren't sewn shut.

I always loved to add a special detail to the back of the shirt like a boot on these shirts.

 Sweet cuddly baby!
I simply made an elephant applique for a plain Carter's onesie, appliqued a some fabric to the bottom of some brown GAP lounge pants, and made my own bib - (one side was tan terry cloth - from a cheap Wal-Mart towel, lots cheaper & more color selections than my local fabric department) I traced another bib we had for the pattern.

If you don't know how to do appliques I'm in the processing taking step by step pictures & writing directions for an upcoming post! So stay tuned! Its addicting...